The Arch Linux Plunge

I finally took the plunge. It’s Thanksgiving in Canada and I am taking a nice relaxing break from work by installing Arch Linux for the first time. I suppose it’s not what most people do for a break from work but hey I am a huge nerd what can I say. I’d been interested in Arch Linux for quite a while and this weekend was just what I needed to get started.

The install process was actually fairly smooth, there were a few bumps here and there but as people always say the Arch forums are fantastic and they helped me more than a few times. So I was working through the install, which is all terminal in case you haven’t done it, while simultaneously installing a new version of Android on my phone when I realise that I needed to leave the house in 15 minutes to get to Thanksgiving dinner on time. I pause, I really want to finish this install but I don’t know how much is left and I don’t want to have to start over. That’s when I thought about exactly what I had done and how I was doing it and realised that I could simply resume at this exact point later but booting from the live usb and mounting the install partition under /mnt and then running chroot again. It was a cool moment and a bunch of stuff just kind of clicked in my brain – Linux level up!

I returned the next day and finished the install fairly quickly (and by finish I mean I can boot into my Arch install using GRUB after it boots it is still just a terminal). I continued on and installed X11 and company. For my window manager I wanted to go with openbox because it is super fast and lightweight kind of how I envision my laptop being. It was neat to see how all of these separate programs work together. I added a file explorer and graphical text editor.

I want to stop here and just briefly mention that throughout this whole install I’ve been slowly falling in love with Arch’s package manager pacman. It is truly amazing! That’s pretty much all I got there.

I was surprised at how quickly I was able to get my system up and running – what was weird was that it was surprisingly easy to get the various tools and stuff that I wanted but what was really hard and still unfinished is getting all the various widgets we take for granted like the wifi menu and battery indicator in the panel etc. Basically my system works, has all the tools I want, is blazing fast but looks like shit lol. Project for another day!

* edit * discovered ArchBang, it is basically Arch except with a few more common things installed like the network manager and battery widget. They also have already put some time into configuring openbox so it actually looks good. I’m glad I went through the Arch config once but in the future I may just cheat and start with ArchBang!

My First OpenCV Commit

Contributing to open source has long been on my to do list, I actually get chirped a lot for my love of open source, anyways I recently finally made the leap and commited some code to OpenCV.

I’d long been on the look out for something good to add to OpenCV and then one day it hit me – I’d had this utility function for cv::PCA that I had been using a lot in my own work that would be a real nice addition to OpenCV. Having decided on what I was going to contribute I started reading on how to go about this and admittedly I was pretty confused what actually helped me figure it out was the generic git hub tutorial, I am a bit embarrassed to say but I am still pretty amateurish with source control but I’m getting better!

So I figure out the process and cloned myself a copy of the OpenCV repository and got right to work. It was a pretty simple addition really, what it does is gives another option for how to create a PCA space. Previously your only option was to specify the exact dimension of the space my addition allows the user to specify the percentage of variance the space should keep and then figures out how many principal components to keep thus deciding the dimension of the space.

It works by computing the cumulative energy content for each eigenvector and then using the ratio of a specific vectors cumulative energy over the total energy to determine how many component vectors to retain. You can read more about the specifics on the PCA wikipedia page. Here is the source code:

    // compute the cumulative energy content for each eigenvector
    Mat g(eigenvalues.size(), ctype);

    for(int ig = 0; ig < g.rows; ig++)
    {
      g.at(ig,0) = 0;
      for(int im = 0; im <= ig; im++)
      {
          g.at(ig,0) += eigenvalues.at(im,0);
      }
    }

    int L;
    for(L = 0; L < eigenvalues.rows; L++)
    {
        double energy = g.at(L, 0) / g.at(g.rows - 1, 0);
        if(energy > retainedVariance)
            break;
    }

    L = std::max(2, L);

After coding my new feature and I wrote a nifty little sample program (you can find it at OpenCV-2.4.3/samples/cpp/pca.cpp) that adjusted the number of dimensions according to a slider bar and showed the effect on reconstructing a face!

Affect of retained variance in a PCA subspace on data reconstruction

I was all ready to go so I pushed to my git hub account and made my pull request to have the code merged. I received an email back the next day with some feedback – a few of my commit messages were junk, I hadn’t realised that this messages would tag along with my code oops! Git rebase to fix that issue. I also had not provided documentation or added tests for my new code – I didn’t even know about the test module and didn’t realise the I could edit the documentation silly me. I wrote the tests first which was kind of fun actually and pretty straight forward as I was able to modify the existing PCA test. The documentation was a bit more out there - I had never worked with sphinx before but luckily I was able to get by simply looking at how stuff was done.

Pull request #2, this one looks much better much more professional  I am pretty proud of it. I wait, I wait I hear nothing, there is a few other pull requests sitting there too. I figure hearing nothing might be good maybe it is because there are no glaring errors and they are carefully reviewing my work. Finally about 2 weeks later pull request accepted! I contributed to OpenCV yay! A bit later on one of the dev’s who I am internet friends with told me to check the OpenCV meeting notes – I got a shout out!

There I am - “a small yet useful extension to PCA algorithm that computes the number of components to retain a specified standard deviate has been integrated via github pull request.”

Also here is a link to the OpenCV page where my documentation can be seen:

http://docs.opencv.org/modules/core/doc/operations_on_arrays.html?highlight=pca#pca-pca

The Tough Mudder

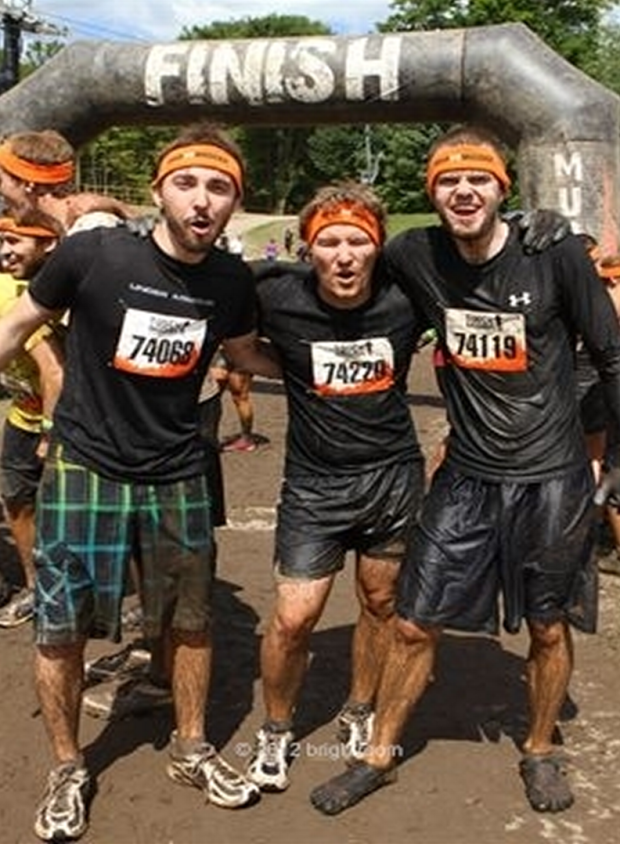
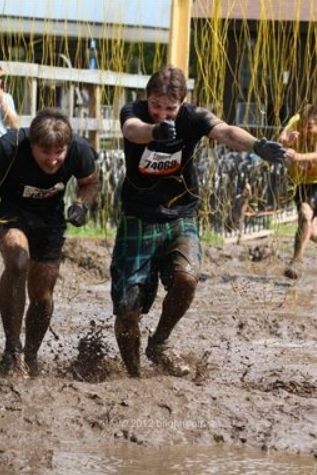
This post will be a brief departure from my usual programming/robots/technology ramblings and talk about something else really cool that I did recently. Yesterday me and 2 friends ran and completed the Tough Mudder in Toronto (well actually it was in Barrie but they called it the Toronto Tough Mudder).

Backing up about 3 months when my friend first posted a trailer for the Tough Mudder on my Facebook wall. We decided we had to do it. We decided but we didn’t do much about it we continued with our standard lifting gym routine and aside from my intramural sports team I wasn’t doing much running. It was almost as if we hadn’t noticed that this thing was a half marathon through the mud - no big deal right?

With only a month to go I finally realise that I am going to need to do some running training. I am in decent shape at this point from the lifting but I definately don’t consider myself a runner. In fact that last time I would have said that I thought I was a good runner would have been grade 6 yeah no joke the filler years were mainly filled with mountain biking, skiing and school. But that was about to change and by the end of my 4 week training program I considered myself a runner again.

So I started training running but I was determined to do it my way. People who know me know that I am a strong believer in the primal lifestyle and while I don’t want to debate that here I simply want to share how I trained and the results. My running training program consisted of running 400 meter intervals trying for a time better than 1:40 which translates to being faster than a 7 minute mile. After each interval I would rest for 1:30 each workout was only 10 intervals, sometimes I would finish with a few 100 meter sprints. During this time I also consulted quite a few resources on how to run properly notably Timothy Ferris’s The 4 Hour Body and some YouTube videos. Oh and of course I was running in my vibram five finger shoes.

The vibram five fingers, I had long been wearing them for lifting and my day to day shoes were essentially barefoot shoes too but I had never really ran in them (I still used cleats for the sports I play). After my first week my calves were so tight it was hard ish to walk – apparently this is common when people start barefoot running. I was determined to power through which meant lots of stretching and using the foam roller. 2 weeks to go and I wasn’t sure if I would be able to run the Mudder in my barefoot shoes. At around this time the 100 meter sprint was on in the London 2012 Olympics and I was super excited to watch Usain Bolt do his thing. Watching his stride inspired me and I also realised an important thing – barefoot running is essentially just proper running re-branded  I mean watch Usain Bolt run no heal strikes there. Re Motivated I trained hard for the next 2 weeks and my calve tightness was becoming less of a problem.

Before talking about the Mudder itself I just want to re-iterate the important details here – I trained for this long distance event using high intensity intervals, I followed my primal diet and did not carb load for training or for the race and I ran in vibram five finger shoes.

The Mudder itself was awesome, like so awesome! 10 out of 10 would do again. One thing that really caught me off guard was the elevation change of the course – it took place on a ski hill so there was some serious vert. The run went great I was pretty fast on the flats ahead of my team most of the time. The hills were nice because it was a really big equalizer. The obstacles were a ton of fun too, most of them weren’t too hard. I really enjoyed this one where you had to crawl through this underground tunnel – reminded me of video games and air ducts etc. I certainly will pause and remember how tough that was next time I am running through the vents in Half Life! The famed electric shock finale was also quite awesome, I took one right in the chest which dropped me to the ground like a sack of potatoes but I was up and running again in the blink of an eye. Crossing the finish line was amazing and they immediately hand you a beer! Best beer ever.

My 2 team-mates running through the electro shock finale. I am somewhere to their right unfortunately not in the picture

We submitted our time and later found out that we finished in the top 5% and qualified for the World’s Toughest Tough Mudder! Notbad.jpg don’t think we will be going though.

Our trusty stopwatch after we crossed the finish lie. 2 hours 54 minutes.