ARPool at OCE Discovery

ARPool (Augmented Reality Pool) was a project I was always very interested in getting involved with so when my supervisor mentioned he need a few of us to get the system ready for a demo I jumped on the opportunity. We were going to be taking ARPool to the Ontario Centers of Excellence Discovery Show – it is kind of a mix between a trade show and a conference poster session. The Queen’s marketing guys were also super excited because they felt Queen’s was out done the previous year and ARPool was our show stealer.

The first thing we had to do was update the travelling version of ARPool, what we needed was an enclosure to keep it dark ish around the system – if it is too bright then the augmented reality projections onto the table are tough to see. We also needed to build a new mount for the projector and camera, our supervisor wanted to try straight projection rather than off of a mirror so it needed to be higher up. We experimented with a few ideas and set up the system in Beamish Monroe Hall and ran a successful demo for Queen’s Admitted Students Day.

At this point I hadn’t had too much exposure to the code behind ARPool but it was already clear that the system was not what I would call rock solid. Near the end of the demonstration the ball detection algorithm was not finding all the balls on the table – fixing the ball detection algorithm would be my first contribution to ARPool. Having learned that testing new algorithms on a live system lacks the quantitative feedback that is necessary to get the best results I took a handful of test images and headed back upstairs to my lab to tackle the issue. A quick look at the old detection algorithm and it was easy to see how the system was suffering from having multiple inexperienced developers. The algorithm went through 4 iterations of finding contours, then drawing the contours to a new image albeit with some filtering each time (area, shape etc.) and then running find contours on this image. I would sincerely hope that the find contours algorithm can find the contours you just drew…

I rewrote the ball detection routine, tested it on my data set and then when I was satisfied brought it back downstairs, ball detection back online. Next I tackled the Background subtraction code – it was actually pretty good but I was able to speed up save and load times dramatically by switching to cv::FileStorage from plain text. We added a simple smoothing filter to the cue tracking just to make the system appear less jumpy to users. The system was working pretty well although there were a few design choices I didn’t care for I thought we were in good shape for OCE.

Raw background subtraction output
Filtered binary image using contour extraction
detected pool balls overlaid on the input image

We packed it all into a single cube van which was seriously pushing it space wise and took off for Toronto. We spent most of the first day schlepping everything from the parking lot to the conference hall and then setting up the structure and pool table etc. We started into the calibration process and while it wasn’t smooth it wasn’t much worse than usual. Calibration finished enter the big problems… We load up the version of the code we had finished with at Queen’s and it isn’t working – wait what this code just worked!? Things are happening out of sync and we can’t figure out why, this is where my frustration with the way the system is set up begins. We eventually load up the code from before we fixed all the various algorithms and it is at least running in the right order… so we slowly add back one feature at a time until the system is working as we left it. I don’t like this – we never figure out the problem and this seems unstable. Oh and by the way it is now the next day at 1:00 the event is starting we got it running just in time. The system runs great for 4 hours straight we’re all a little surprised frankly. We demo to a lot of interested people mostly other demonstrators at the event (I’m still not totally sure I really understand the point of this event). We had back to the hotel after the reception which by the way was pretty fun oh and did I mention the Queen’s put us up at the Royal York (it’s pretty swanky). After dinner we went to a Jay’s game to relax for the evening.

The next morning (and this is the more important day of the show) we arrive and boot up ARPool – aaaannnd it’s not working today seriously this system is moody we ran it 4 hours straight no issues yesterday and now it’s deciding not to work again. I don’t remember exactly how but I do remember that I was the one who fixed it – I added or changed some piece of code that was completely trivial and then the system started working again – hmmm whatever I just want to get through this day now.

Got the system up and running and the day was a success – pics or it didn’t happen!

Our demo booth
A conference attendee playing ARPool

So what was the issue? Well ARPool is an event driven program written in Qt using signals, slots and the works including several timer events. Our best guess is that sometimes they would get our of sync. We had worked really hard on improving the algorithms but what really got us in trouble was the system layout and how tough it was to see and control the order code was executed. The higher level stuff was really poorly organized and documented for example there were 2 functions that were very key to the operation one called “run” the other “run_again” uh yeah that is not how we do things.

All in all a successful but certainly not stress free trip. I vowed to fix the system layout of AR Pool before our next demo because I did not want a repeat of OCE - that and I’m an engineer and I have the problem solving bug and this was a problem screaming to be solved and I already had an idea how…

FRC Rebound Rumble Vision System

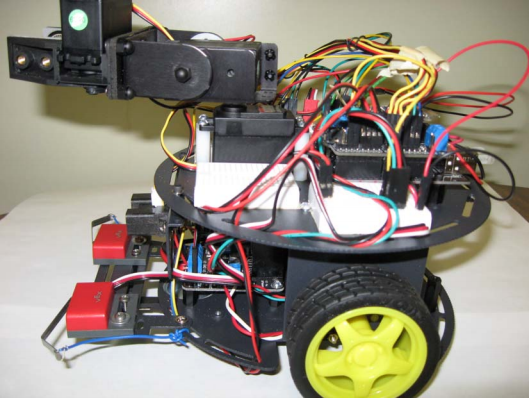
One and a half weeks until we were heading to the First Robotics World Championship in St. Louis and our vision targeting system needed some serious TLC. At our last regional we swapped out our old system which was running on board the CRio with a new vision system that I had written using the smart dashboard which allowed us to offload the vision system to the driver station. The new vision system was way better for a number of reasons but admittedly the performance of the vision system was about the same.

In addition to changing where the vision processing was done I also totally changed the algorithm to use higher level OpenCV functions as opposed to the old system which was a crude stride detector operating on raw pixels implemented by another mentor. For worlds there was some debate over which approach was better and frankly despite what many people may have thought we really had no idea how well or not well either approach actually worked.

I’ve come to notice a common pitfall when dealing the so called “real” systems people tend to make small changes and then watch it work once and think they have fixed or improved it. I understand why there is a ton of temptation to simply try your new idea and this isn’t wrong just sometimes we need to take a step back and do it properly. This was one of those times and it presented a great opportunity to teach the students about proper testing, ground truth and of course explain this pitfall.

So I headed to the warehouse where our field was setup and using a simply extension to the smart dashboard that I wrote I collected 1000 images of the vision targets at various orientations and angles. The vision target for reference:

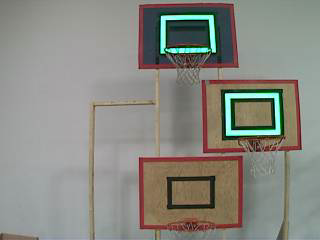
You wouldn’t think that finding a giant glowing green rectangle would present much of a problem, I mean I wish all computer vision problems were this simple, but none the less there are some details which make it tricky. The net likes to obstruct the rectangle causing a break in it – this can be easily fixed with morphological operators but this can get you into trouble by joining the target stadium lights from above. TL;DR yeah it’s easy but still not trivial.

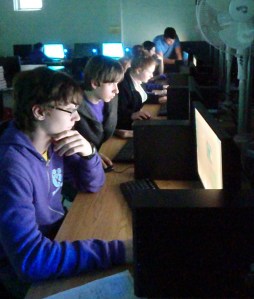
So what am I going to do with all these data it isn’t labelled - oh wait don’t I mentor a team of 40 high school students? commence image labelling sweat shop! Seriously though we had all hands on deck for this one, I made a simple procedure to follow and then everyone helped label the data.

Truth Labelling is fun!

Fun times! Check out the full blog post from KBotics for more pics:

http://kbotics.ca/2012/04/05/image-processing-party/

I took the labelled data and created a program to test the algorithms on – first run it was pretty clear my new algorithm found the target in ~850 of the images while the old approach found 3… After some parameter tweaking I was able to get my algorithm to detect 997 of the 1000 - notbad.jpg!

Here is a link to the github repo for our final vision system: github.com/pickle27/2809_vision2012.git

Next KBotics meeting I presented my findings and taught all the students about how our vision system works, I like to think they learned a thing or two ;)

Arduino + Bluetooth + XBox 360 Controller = Fun!

Earlier this week I was asked to put together a robotics demo for the Electrical and Computer Engineering first year discipline night. This is the night where we try and entice the first years (Queen’s is a general first year) to choose ECE for their discipline for second and hopefully subsequent years. Now I could have ran any number of basic demonstrations that would have taken no time at all but of course I chose to take the opportunity to do something cool (well at least I think it is cool…).

Being the teaching assistant for ELEC 299, a second year course which uses mobile robots, I had access to some pretty cool hardware. I’d been playing with the robots for a while so I knew all the basic features now it was time to go above and beyond.

robot

I hooked up the bluetooth shield and started looking into how to send commands from my computer. I had a program from previous years in the course that did just this but it was in the form of a windows binary and I a) couldn’t be bothered to boot into windows and b) wanted to do it myself anyways. I googled around for a bluetooth library and decided on pybluez with python. It took me a bit to get set up to send data between the two but it wasn’t too tough. I borrowed a getch() class from stack overflow to facilitate only grabbing one key press at a time and then sent it to the robot. Of course I chose the familiar control scheme of W S A D`.

Here is the python code, it’s pretty simple:

from bluetooth import *
from getch import getch

MAC_ADR = "00:3C:B8:B1:14:22"

# Discovery
#print "performing inquiry..."
#nearby_devices = discover_devices(lookup_names = True)
#print "found %d devices" % len(nearby_devices)
#for name, addr in nearby_devices:
     #print " %s - %s" % (addr, name)

# Create the client socket
client_socket = BluetoothSocket( RFCOMM )
client_socket.connect((MAC_ADR, 1))

print "Connected"
print "Press 'q' to quit"

key = 0;
while key != 'q':
    key = getch() #gets 1 key only
    print key
    client_socket.send(key)

# Close the connection
client_socket.close()

and the getch class

class _Getch:
    """Gets a single character from standard input.  Does not echo to the screen."""

    def __init__(self):
      try:
          self.impl = _GetchWindows()
      except ImportError:
          self.impl = _GetchUnix()

    def __call__(self): return self.impl()

class _GetchUnix:
    def __init__(self):
        import tty, sys

    def __call__(self):
        import sys, tty, termios
        fd = sys.stdin.fileno()
        old_settings = termios.tcgetattr(fd)
        try:
            tty.setraw(sys.stdin.fileno())
            ch = sys.stdin.read(1)
        finally:
            termios.tcsetattr(fd, termios.TCSADRAIN, old_settings)
        return ch

class _GetchWindows:
    def __init__(self):
        import msvcrt

    def __call__(self):
        import msvcrt
        return msvcrt.getch()

getch = _Getch()

After I got the connection stuff working and out of the way it was pretty simple to write an Arduino program to accept my input and respond accordingly.

But I wasn’t done just yet! I wanted to take my demo further and use an XBox 360 controller instead of the keyboard. It turns out this really wasn’t too hard I used pygame to read from the joystick and the rest is pretty much history. Now I will admit at this point I had pretty much proved my point and I needed to get back to more important work so the final result was a bit of a cop out. Rather than modify my Arduino program to read analog data over serial and really use the controller I simply mapped joystick values to W A S D in python before sending it over bluetooth. It would be really cool to come back and finish this properly but for now my demo was done.

XBox 360 Controller python code:

#!/usr/bin/env python

import bluetooth
import serial
import pygame
import time
import math

# init controller
pygame.init()
controller = pygame.joystick.Joystick(0)
controller.init()
print 'Xbox Controller Connected'


# Create the client socket
MAC_ADR = "00:3C:B8:B1:14:22"
client_socket = bluetooth.BluetoothSocket( bluetooth.RFCOMM )
client_socket.connect((MAC_ADR, 1))
print "Bluetooth Connected"
print ' '
print ' '


print '/**************************/'
print 'Joystick Drive Program'
print "Press 'q' to quit"
print '/**************************/'

key = 0
y = 0
x = 0
while key != 'q':
    for event in pygame.event.get():
        if event.type == pygame.JOYAXISMOTION:
            if event.axis == 1:
                y = event.value
                if math.fabs(y) < 0.2:
                    y = 0
            if event.axis == 3: #4 in windows, 3 in linux
                x = event.value
                if math.fabs(x) < 0.2:
                    x = 0


    # send to arduino
    command = ' '
    if y < 0:
        command = 'w'
    elif y > 0:
        command = 's'
    elif x < 0:
        command = 'a'
    elif x > 0:
        command = 'd'

    print command
    client_socket.send(command)
    print client_socket.recv(1024)


# Close the connection
client_socket.close()

And finally the Arduino Program:

// bluetoothDrive
// Kevin Hughes
// 2012

// Motor Pins
int E1 = 6;
int M1 = 7;
int E2 = 5;
int M2 = 4;

void setup()
{
  // set pin modes
  pinMode(E1, OUTPUT);
  pinMode(M1, OUTPUT);
  pinMode(E2, OUTPUT);
  pinMode(M2, OUTPUT);

  // init
  Serial.begin(115200);
}


void loop()
{
  int command;
  if(Serial.available()) {
    command = Serial.read();

    // Moving
    if(command==119)
      driveForwards();
    if(command==115)
      driveReverse();
    if(command==97)
      turnLeft();
    if(command==100)
      turnRight();
    if(command==32)
      driveStop();

  }// end if
}


// Subroutines and Functions
void driveForwards() {
  digitalWrite(M1,HIGH);
  digitalWrite(M2,HIGH);
  analogWrite(E1,100);
  analogWrite(E2,100);
}

void driveReverse() {
  digitalWrite(M1,LOW);
  digitalWrite(M2,LOW);
  analogWrite(E1,100);
  analogWrite(E2,100);
}

void driveStop() {
  digitalWrite(M1,HIGH);
  digitalWrite(M2,HIGH);
  analogWrite(E1,0);
  analogWrite(E2,0);
}

void turnLeft() {
  digitalWrite(M1,HIGH);
  digitalWrite(M2,LOW);
  analogWrite(E1,100);
  analogWrite(E2,100);
}

void turnRight() {
  digitalWrite(M1,LOW);
  digitalWrite(M2,HIGH);
  analogWrite(E1,100);
  analogWrite(E2,100);
}

Pretty simple really it just waits for a serial command, checks if it matches W A S or D and then executes the appropriate code.

Hope you enjoyed this, the demo was a hit at the discipline night!